Tuesday, 24 October 2017
Using multimeter to testing resistance
To begin, make sure no current is running through the circuit or component you want to test. Switch it off, unplug it from the wall, and remove any batteries.
Remember that you'll be testing the resistance of the entire circuit. If you want to test an individual component such as a resistor, test it by itself—not with it soldered in place!
Plug the black probe into the COM port on your multimeter.
Plug the red probe into the VΩmA port.
Switch on your multimeter, and set the dial to resistance mode.
Resistance is measured in ohms, indicated by the Ω symbol.
Most multimeters are not autoranging, meaning you will need to set the correct range for the resistance you expect to measure. If you're not sure, start with the highest setting.
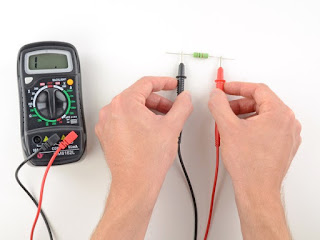
Place one probe at each end of the circuit or component you want to test.
It doesn't matter which probe goes where; resistance is non-directional.
If your multimeter reads close to zero, the range is set too high for a good measurement. Turn the dial to a lower setting.
If you set the range too low, the multimeter simply reads 1 or OL, indicating that it is overloaded or out of range. This won't hurt the multimeter, but we need to set the dial to a higher range.
The other possibility is that the circuit or component you are testing doesn't have continuity—that is, it has infinite resistance. A non continuous circuit will always read 1 or OL on a resistance test.
With the multimeter set to a usable range, we get a reading of 1.04k ohms.
Subscribe to:
Post Comments (Atom)
Perform housekeeping duties
the requirements of housekeeping The word “housekeeping” can interpret cleaning floors and surfaces, removing dust, and organizing clutter...

-
OH&S regulation for the it industry The purpose of the OHSR is to promote occupational health and safety and to protect workers...
-
To begin, make sure no current is running through the circuit or component you want to test. Switch it off, unplug it from the wall, and rem...


No comments:
Post a Comment